Pods are the smallest deployable units of computing that you can create and manage in Kubernetes. This is what written in the official documentation of Kubernetes but what does exactly a pod mean?

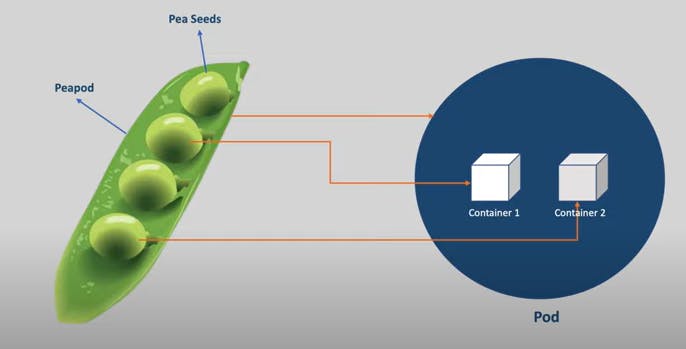
From this image we can get an understanding that a pea-pod resembles a pod and the pea-seeds resembles a container. So we can say that Kubernetes pod is an encapsulated layer for our containers
A pod can have one or more containers, so when we want to run our application we will run it in the containers just like we can do it in docker, but in Kubernetes the container alone cannot be deployed and it needs to be
wrapped up in a pod.
You might be wondering why we need this extra layer of pod whenever application runs in a container in most cases each part will be having
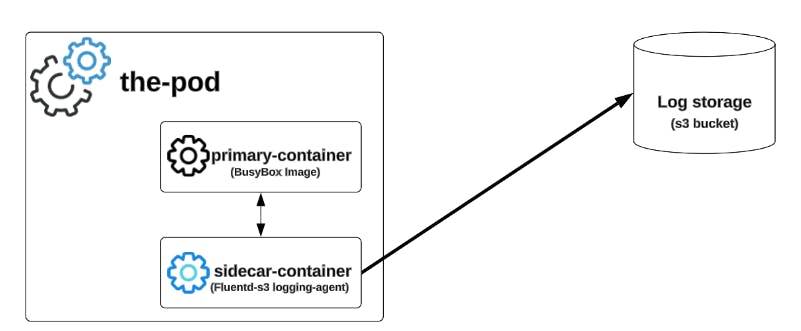
only one container let us see a use case where we need more than one container, this extra container can also be called as Sidecar Containers.
Use Case for Sidecar Container:
Logging and Monitoring: One of the most common use cases for sidecar containers is to handle logging and monitoring tasks. The sidecar container can be responsible for collecting logs or metrics from the main application container, formatting them, and forwarding them to a centralized logging or monitoring system. This separation of concerns allows the main application container to focus solely on its primary function without being burdened by additional responsibilities like log management.

Why do we need Pods?
- Grouping Containers:
A pod provides a logical grouping of one or more containers that are scheduled together on the same node within the Kubernetes cluster. While Docker itself primarily focuses on running individual containers, Kubernetes orchestrates multiple containers within pods, allowing them to share networking, storage, and lifecycle management.
- Shared Network Namespace:
Containers within the same pod share the same network namespace, enabling them to communicate with each other over localhost. This facilitates seamless communication between containers within the pod, simplifying networking configurations.
- Shared Storage Volumes:
Pods can mount shared storage volumes that are accessible to all containers within the pod. This allows multiple containers within the pod to access and manipulate the same data, facilitating data sharing and collaboration between containers.
- Atomic Unit of Deployment and Scaling:
Pods serve as the smallest deployable unit in Kubernetes, providing a cohesive environment for deploying, scaling, and managing containerized applications. Kubernetes schedules pods onto nodes based on resource availability and constraints, ensuring efficient resource utilization and high availability of applications.
Creating Pods:
In Kubernetes, we can create pods using various methods, including imperative commands, declarative configuration files, or programmatically through the Kubernetes API. But Here are two most used ways to create pods:
- Imperative Command:
You can use "kubectl" command-line tool to create a pod imperatively by specifying all the necessary details in the command itself.
For example:
kubectl run nginx-pod --image=nginx

This command creates a pod named "nginx-pod" using the container image "nginx"
- Declarative Configuration File:
We can create pods declaratively by writing YAML or JSON configuration files that describe the desired state of the pod. Here's an example YAML file:
apiVersion: v1
kind: Pod
metadata:
name: nginx-pod
spec:
containers:
- name: nginx-container
image: nginx
Save this configuration to a file, for example, nginx-pod.yaml, and then apply it using the kubectl apply command:
kubectl apply -f nginx-pod.yaml

Listing details of pod:
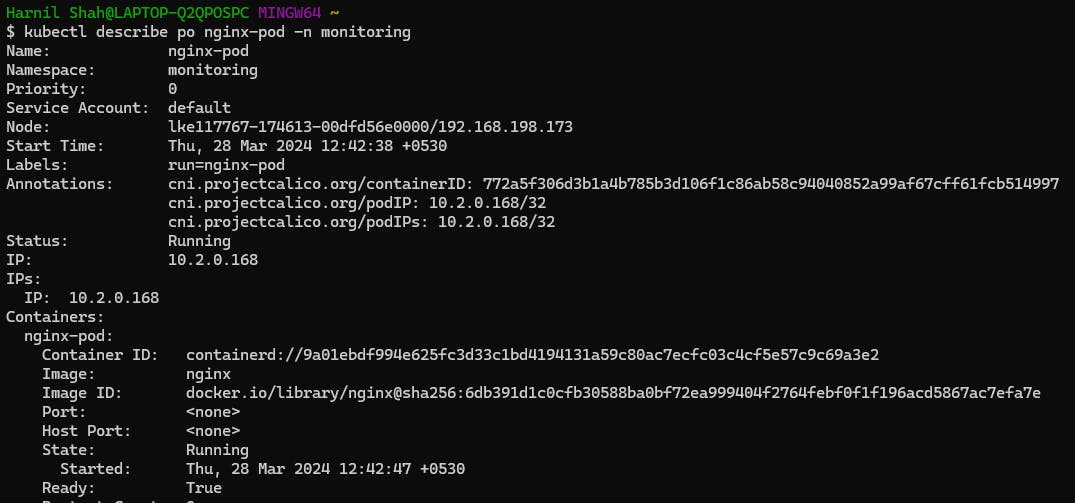
- kubectl describe po <pod-name> -n <namespace>


Name and Namespace: Specifies the name of the Pod (nginx-pod) and the namespace it belongs to (monitoring).
Node: Indicates the node on which the Pod is running along with its IP address.
Start Time: Shows the time when the Pod started running.
Status: Displays the current status of the Pod (Running).
IP: Shows the IP address assigned to the Pod (10.2.0.168).
Containers: Provides details about the containers running within the Pod, including their IDs, images, state, readiness, restart count, and mounts.
Conditions: Indicates the status of various conditions related to the Pod, such as initialization, readiness, and container readiness.
Volumes: Lists the volumes mounted within the Pod, along with their types and sources.
QoS Class: Specifies the Quality of Service class assigned to the Pod (BestEffort).
Node Selectors: Shows any node selectors specified for the Pod.
Tolerations: Displays any tolerations set for the Pod.
Events: Provides a chronological list of events related to the Pod, including scheduling, pulling/pulling status of the container image, container creation, and container start.
Getting into the pod:
When we run this command, we'll be dropped into an interactive shell session within the specified pod, where we can run commands and perform operations directly inside the container. This is useful for troubleshooting, debugging, or performing administrative tasks within the containerized environment.
- kubectl exec -it <pod-name> -n <namespace> -- sh

Port-Forwarding of a pod:
Well, we deployed our application but how can we access it? we cannot access pod directly from outside of the node, it can be accessed only from within the node. There are multiple ways of accessing the application from outside of the cluster but if we have access to our cluster then there' a simple way of doing it, that is port-forwarding
- kubectl port-forward <pod-name> <local-port>: <container-port>

Now, we can access our nginx application via our browser by
http://localhost:8080/ or http://127.0.0.1:8080/

Hence in this way we can do port-forwarding which can be helpful in Debugging, accessing, testing purposes etc.
Checking logs of the pod:
Checking logs in a Kubernetes environment is crucial for debugging, monitoring, and maintaining the health of applications. Logs provide insights into application behavior, errors, and performance metrics, allowing developers and operators to troubleshoot issues, monitor system health, optimize performance, and ensure compliance with regulatory requirements.
- kubectl logs <pod-name> -n <namespace>
Deleting the pod:
If we don't need the pod, we can delete it using this command:
- kubectl delete po <pod-name> -n <namespace>

If you encounter any issues like pod being restarted or recreated repeatedly, then there might be misconfiguration in the Replication-Controllers, ReplicaSets, StatefulSets, and DaemonSets which we will cover in the next blog, till then stay tuned!
Summary:
This blog explains the concept of pods as encapsulated layers for containers and highlights their importance in Kubernetes, particularly in facilitating grouping, shared networking, shared storage, and efficient deployment and scaling of containerized applications. The post covers various aspects of pod management, including creation methods, use cases for sidecar containers, and common operations such as accessing pods, port-forwarding, checking logs, and deleting pods with explanation, commands and its screenshots. Overall, the blog post offers a comprehensive overview of Kubernetes pods and their role in container orchestration.
Thank you for reading till here, you can sign up my newsletter for more such upcoming blogs. Your feedbacks will be appreciated.
Stay curious, keep reading!
Harnil Shah